Contents of this page:
Creating the tasks
When the set-up phase is complete — all the config settings have been defined — you can create the tasks your students are going to attempt.
Each task includes hints and descriptions, so is quite verbose. The default tasks are the ones that come built-in with the server, and you might not need to change them. But if you want to, there are two ways to customise them. You can edit each one individually, up on the race server. Alternatively, you can download the whole lot as a single markdown file, which you can then edit conveniently offline and upload when you’re done: see the instructions below.
If you use the default tasks that come pre-built on the race server, the first two tasks of phase 0 (getting and running the code) will be customised to match your config settings (especially in the “GitHub” group, i.e,, how the buggy editor code is distributed).
Specifically, tasks 0-GET and 0-RUN may differ based on which distribution method you are using.
Creating the tasks is potentially destructive (it will delete any existing tasks), so you need the authorisation code to do it.
Be careful! Although you can create the task list at any time, doing so will delete any existing tasks and replace them with the new ones. You shouldn’t do this once the project has started!
Accept the defaults
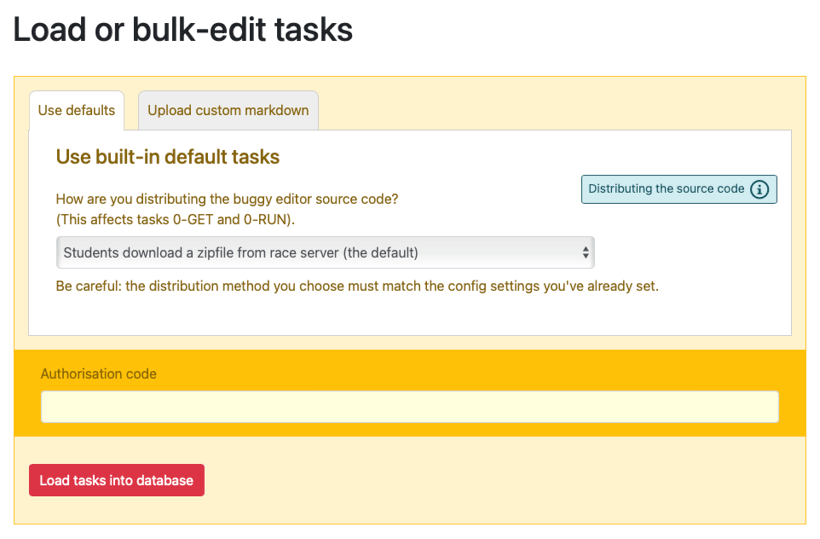
Loading the default tasks. The first two tasks of phase 0 (0-GET getting the source code, and 0-RUN running it) will be customised depending on how you’ve decided to distribute the buggy editor source code to your students).
The simplest way to create the tasks is to accept the default tasks delivered with the project. To do this, don’t upload anything. Choose Yes to the Are you sure? prompt, select the distribution method that matches how your students get the buggy editor source code, and press the red Load tasks into database button.
This will populate the database with the default 27 tasks in 7 phases.
Make sure the distribution method you choose matches the decisions you made in your configuration settings! See more about how the buggy editor code is distributed, which includes the specific settings needed for each method.
If you want to edit the tasks offline (see the next section), but you’re not using the default distribution method, it’s probably easiest to load the defaults like this first, being careful to choose the appropriate distribution method. This changes the first two tasks’ texts to match your setup (this is a default-within-a-default!). Now you can download the current tasks as markdown and that change will already be in there… and you can dive in and edit them further.
Or upload a customised markdown file
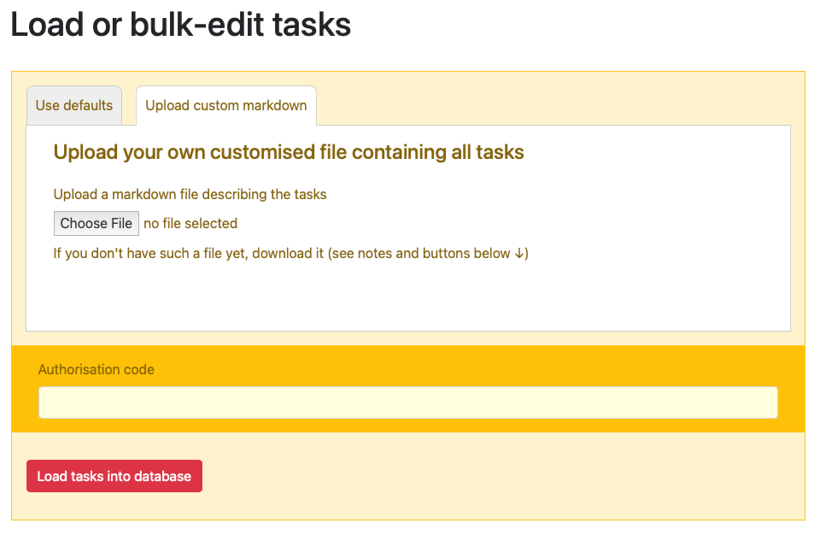
Instead of using the default tasks, or editing them in place, you can download them all in one markdown file, edit it, and upload it back here — the race server parses that file and inserts the individual tasks into the database. Because tasks can be verbose, this may be much more convenient.
Before you can upload your own markdown file, you need to download one from the race server as a basis to work from. There are two Download buttons on the load task admin page (below the form).
-
Download the default tasks as Markdown
The downloaded file will contain the complete details of the default tasks — regardless of what’s in the database. These will always be the unedited, default tasks. -
Download the current tasks as Markdown
The downloaded file will contain the complete details of existing tasks in a markdown file that you can edit (and subsequently upload). This file contains edits (if any) that have been made since the tasks were added to the database.
Be careful to respect the organisation of the markdown file you downloaded, because the server uses that structure when it parses what you send back up. If you break it badly (or upload a file that isn’t markdown) you’ll probably see a Error parsing/adding tasks: No tasks found error. The level of the headings is significant: # for the name, ## for the title, and ### for the Problem, Solution and Hints sections. If you deviate from this structure, the file probably won’t parse the way you expect.
Then edit on the race server
Once you’ve loaded or uploaded them, you can edit the tasks on the race server. In practice this allows you to make refinements and corrections to the tasks that are now held in the database.
Remember that any changes you make here will not be seen by the students until you publish (or re-publish) the task list.
Be careful about materially changing any tasks once the project has started: it is not recommended.
Changing the name or phase of a task, changes its URL too — so don’t do this if any students already have links (this may include in GitHub issues if you’re automatically injecting those into students’ repos).
Substituting config settings in the text
Inside the tasks’ markdown texts, words like this: %CONFIG_NAME% (all-caps between %, no spaces) will be replaced with the value of the config setting with that (exact: type it carefully!) name. For example, %BUGGY_RACE_SERVER_URL% will be replaced with the URL you have set in that config setting.
You can check the config settings’ names by looking on the race server where you set them: Admin → Config lists them all.
This substitution of placeholders with values happens when the task list is published (not when they are uploaded into the database). This means that if you change config settings, you should re-publish the task list to reflect the latest values.
Setting hint levels
You can choose to mark some of the task hints as being of different levels, so that they are only shown when a student chooses to reveal them. We introduced this as a way to not overwhelm students with suggestions that may be more complex than they need. (This is a consequence of encouraging students to decide for themselves how thoroughly they implement specific tasks).
To enable this feature, set IS_TASK_HINT_LEVELS_ENABLED to Yes.
When task hint levels are enabled, you can indicate the level of a task hint in the (markdown or HTML) text when you edit a task. Three levels of hint are currently supported (in addition to the “zero-level” default). Add one of <!>, <!!> or <!!!> as the very first item in a paragraph or list item.
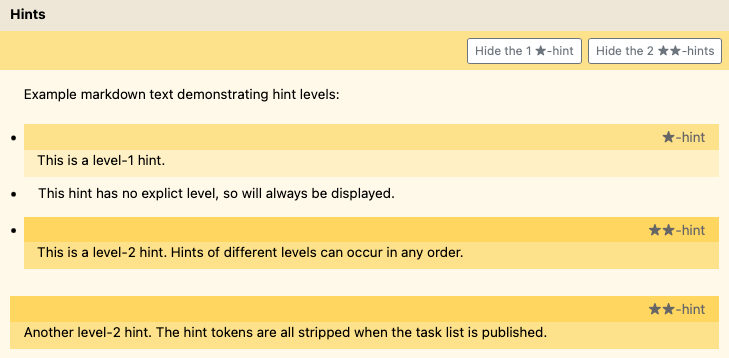
The following example of some hint text, in markdown, has one level-1 hint and two level-2 hints:
Example markdown text demonstrating hint levels:

* <!> This is a level-1 hint.

* This hint has no explict level, so will always be displayed.

* <!!> This is a level-2 hint. Hints of different levels can occur in any
  order.

<!!> Another level-2 hint. The hint tokens are all stripped when the task list
is published.
When the task list containing this hint text is published, if hint levels are enabled, they will be hidden, with buttons for revealing them:

This is the same example, after both buttons have been clicked:
The hide/show hint mechanism is implemented in Javascript, so if viewed in a browser without JavaScript enabled, no hints are hidden.
Publishing the task list always strips any hint tokens (like <!>), whether or not IS_TASK_HINT_LEVELS_ENABLED is set.
Hint tokens are currently only supported for <p> or <li> elements (after the Markdown has been parsed), and must be the first item in the element’s content.
Publish the task list
You must explicitly publish the task when you have finished editing the tasks. The task list is the static, public page that describes the work you require your students to do. If you make any changes either to tasks or config settings they might refer to, you should publish (or re-publish) the task list.
The race server will show the Publish button in red if it detects changes since you last published it, but this isn’t foolproof — especially if you’ve made any changes to config settings since you last published it… so remember to publish the tasks whenever you change something within them!
Note that publishing the task list will also publish a CSV file containing the tasks, which may be useful if your students are using GitHub or GitLab.
- Previous: Tech notes config