Installing on Heroku
Heroku isn’t the only cloud platform-as-a-service you could use! We’re using it as the example here because it’s the one we’ve got experience of running the race server on.
The race server repo is suitable for running as an app on cloud-hosting server Heroku.
For normal use (such as running the classes over a term), Heroku fees for the web app (“Basic dyno”) are $7 per month, with Postgres database (“Mini”) at $5 — that is:
$12 per calendar month for the whole server
(that’s about £9.35)
These prices were correct as of July 2023, but could go out of date!
See prices on the Heroku website.
This page runs through the process of setting up your own race server on Heroku. If you’re familiar with Heroku, you might prefer to use the Heroku CLI to set things up — the following instructions guide you through getting the race server up and running using only the Heroku website’s interface.
You’ll need accounts with both GitHub and Heroku. If you have neither, the process is probably simplest if you create your GitHub account first.
Contents of this page:
- Installing on Heroku
- 1. Sign into GitHub
- 2. Fork the race server repo
- 3. Sign into Heroku
- 4. Create a new Heroku app
- 5. Add Python and Node.js buildpacks
- 6. Choose the “GitHub” deployment method
- 7. Add a database resource
- 8. Set some configuration variables
- 9. Add a domain (if you want)
- 10. Add SSL Certificates
- 11. Deploy the site
- 12. On the site, complete the set-up phase
- Thereafter…
1. Sign into GitHub
If you haven’t got a GitHub account yet, sign up. It’s also possible to fork from an organisation account — with some practical caveats — but the instructions on the rest of this page assume you’re using “your GitHub account”.
2. Fork the race server repo
Once you’re logged into GitHub, go to our buggy race server repo and fork it into your own GitHub account.
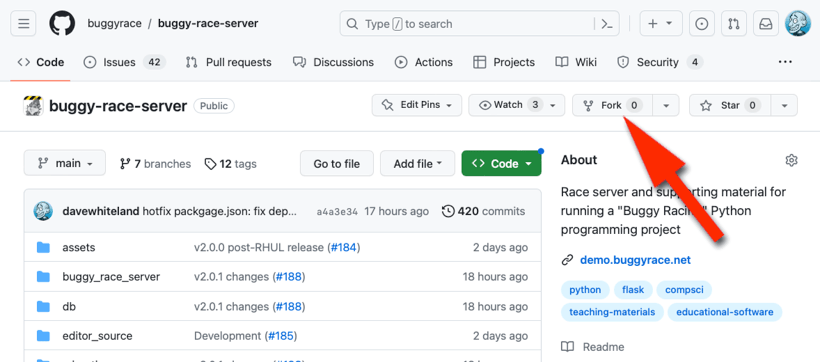
Click on the Fork button on the server repo to fork a copy into your own GitHub account.
There’s a Fork button on the repo — click on that to get your own copy (your “forked repo”), which you can use to deploy onto Heroku. Normally, you only need to include the main branch when you make your fork.
You’ll see it appear at:
https://github.com/YOUR-USERNAME/buggy-race-server
3. Sign into Heroku
If you haven’t got a Heroku account yet, sign up.
When you log into Heroku you should follow the instructions to authenticate your account with your GitHub one. You only have to do this once per Heroku account.
4. Create a new Heroku app
Click on Create new app. Give it a sensible name (this can be seen by students). If you can’t think of anything better, buggy-race-server works :-)

Create a new Heroku app by providing a name. You can use buggy-race-server if you’re only using one.
Choose an appropriate region. See these notes about GDPR and privacy considerations, which may affect your decision.
5. Add Python and Node.js buildpacks
Now you’re “in” the page for your new app.
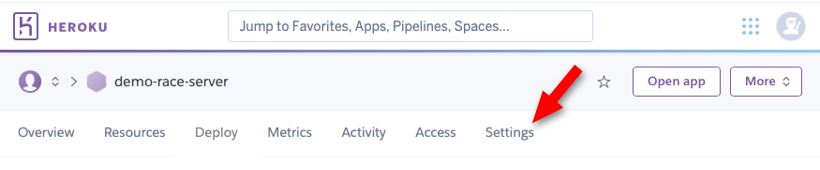
There are seven tabs: first, go to Settings.
Go to the Settings tab, and find Buildpacks. You need to add two. Click on Add buildpack and choose each of these, in this order:
- python
because the race server is a Python application - nodejs
because the server uses webpack, which requires node.js
You’ll see a note telling you that these will be applied when you deploy the application.
You must add the Python buildpack first, before the Node.js one (if you did not, you can click and drag them to change their order). The Python buildpack defines the flask command before node.js runs it.
6. Choose the “GitHub” deployment method
Go to the Deploy tab, and then click on GitHub: Connect to GitHub as the deployment method. You’ll be invited to connect to your forked repo — Heroku offers it in a drop-down menu because your Heroku account is linked to your GitHub one. When you’ve selected it, click Connect.
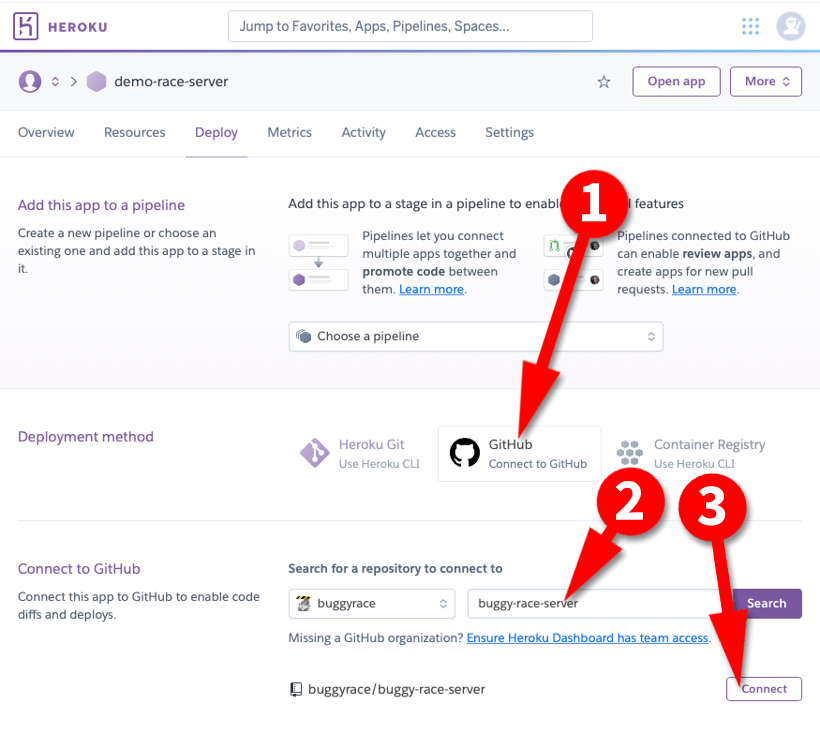
Connect your Heroku app to your own GitHub account’s fork of the buggy race server by using GitHub (1), finding the repo you just forked (2) and clicking Connect (3). The owner of the repo will be you (and not buggyrace), because you’re connecting to your own fork.
Don’t deploy yet, you’re not quite ready!
Later, when it is time to deploy, we recommend you do not choose automatic deployment. You’re probably best using Manual deployment (from the main branch).
7. Add a database resource
Go to the Resources tab and click on Find more add-ons. You’re shown a page with lots of choices, but you want Heroku Postgres (“Reliable and powerful database as a service based on PostgreSQL”). Click on that.
This is a paid-for service: it’s about to cost you $5 per calendar month for the “mini” service.
You’ll be asked to nominate the App to provision to. Provide the name of your app (e.g., buggy-race-server).
Click on Submit Order Form.
8. Set some configuration variables
Back at your app page (now with a database resource too), go to the Settings tab and by Config vars click on Reveal config vars.
You’ll see that Heroku has put one in there already called DATABASE_URL (you can’t edit this — and you don’t need to). If you’ve just started the database, don’t panic if you don’t see it yet: it might take a few minutes until it appears… you can do all the following steps up until “deploy the site”.
We recommend you add the following three config vars, exactly like this:
| Name | Value |
|---|---|
FLASK_APP | buggy_race_server/app.py |
FORCED_DB_URI_SSL_MODE | require |
IS_REWRITING_DB_URI_PW_AS_QUERY | 1 |
FLASK_APP is always necessary here, and it’s a file path so use the value exactly as shown above (that is, it is not supposed to match your server name).
Our recent experience is that the current version of SQLAlchemy running on Heroku (hosting its PostgreSQL service on Amazon AWS) won’t connect without the latter two.
If you want to set a non-default authorisation code before you set up, you can do so here by adding a value for AUTHORISATION_CODE. The very first step of your set-up on the site will be to change this again. So this is a temporary setting that prevents anyone accessing the set-up phase (for example, while you’re waiting for a custom domain to propagate) with the default auth code (“CHANGEME”) before you set it to a secure one. This temporary one isn’t as secure because it’s in plain-text up on Heroku (albeit behind a secure login), which is why you should delete it once you’ve finished your set-up phase.
| Name | Value |
|---|---|
AUTHORISATION_CODE | s0meThINgS3cr3t |
9. Add a domain (if you want)
You don’t need to add a domain — if you don’t then your race server will be available to the public (that is, your colleagues and students) at a URL like
https://buggy-race-server-4b43efcad2e9.herokuapp.com
You can run like that — especially if you’re linking to it from a course module site (such as Moodle or Blackboard).
However, you may prefer to run the server on a custom domain. For example, you could run your race server on a subdomain or path on your institution’s own domain. Alternatively, you could register a new domain — they are relatively inexpensive, and remember you don’t need hosting for this — Heroku are already providing that). You or your tech team will need to have access to the Domain Name Service (DNS) records for the domain you are going to use.
Go to the Settings tab and click Add domain. Enter the domain exactly as you intend (for example, for our demo site we typed demo.buggyrace.net).
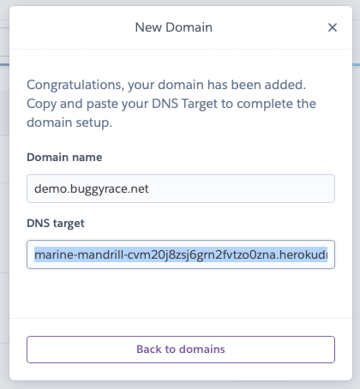
When you provide the domain name (in this example, we’re setting up demo.buggyrace.net), Heroku will show you the DNS target you need to set your domain name, as the alias, to point at.
Copy the “DNS target”. Go to the your DNS provider and add a CNAME record, aliasing the desired domain name with the underlying, canonical one.
The details of how to set your DNS records will vary depending on who is managing your domain — typically this will be your domain registrar (where you bought the domain), or your tech team if you are at an institution that runs its own.
It will take a while to percolate through the internet once you’ve done this.
You can always access the app — your race server — directly by using URLs with the herokuapp.com domain. However, if you are using a custom domain, don’t do this! The server will be generating content (links in the HTML, and cookies that manage login sessions) using that domain name. This is why you should not use (or share) the herokuapp.com URLs to access the race server if you are using a custom domain.
If you don’t want to, or cannot access, your institution’s DNS, we might be able to help by adding your institution name as a subdomain to buggyrace.net (like asbp.buggyrace.net for the Acme School of Buggy Programming). Get in touch if that’s of interest.
10. Add SSL Certificates
You need SSL certificates so your site runs under https (see these privacy considerations).
Go to the Settings tab and click on Configure SSL. On the dialogue that pops up, you have two choices:
-
Automatic Certificate Management (ACM)
Click this to delegate this to Heroku — in most circumstances this will be enough: click Next -
Manual Certificate
Choose this if you are setting up your own domain, and you have certificates to provide. If you’re running as a subdomain ofbuggyrace.netthen you can use the certificates in thessldirectory of the repo you forked. Note that you’ll need us to agree to add your subdomain as aCNAMEto our DNS for this to work.
11. Deploy the site
Ideally do this once the domain is in place, so you’re hitting it with the same URL, on the same domain, that your students will be using.
If you added a domain (see above), Heroku will (correctly) serve a 502 Bad Gateway error on your custom domain (that is, not the herokuapp.com one) until you’ve deployed. Our own experience, using Cloudflare to manage the DNS records, is that propagation happens surprising quickly (for example, in 10 minutes or so).
You can launch the site now — go to Deploy and choose Manual deploy. Normally you will always be deploying from the main branch. Click on Deploy Branch
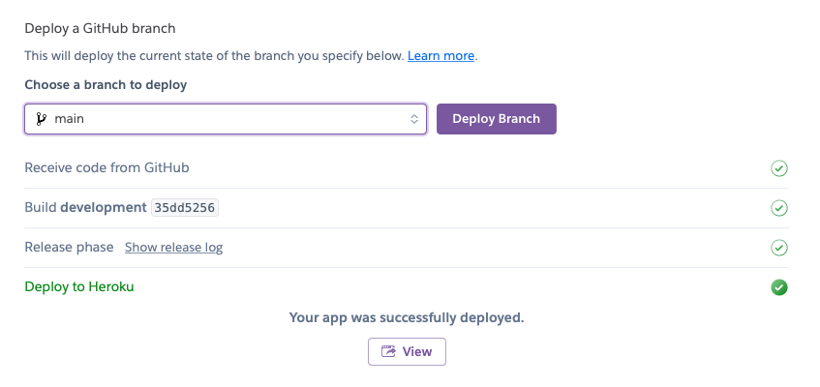
Manually deploying the latest code from the main branch to the Heroku server. This page shows a successful deployment: the green ticks and the message “Your app was successfully deployed”.
Deployment should now run to completion: you’ll see the build process burbling away and scrolling up in a panel at the bottom of the page.
Be patient: it takes a little while, especially the first time (when a lot of dependencies are being loaded).
If everything works, you’ll see a message saying “Your app was successfully deployed” and a series of green ticks.
If it doesn’t end that way, there will be a red link and you can check the release log to see what the error reported was. We might be able to help you to deciphering that, in which case it may be helpful to copy-and-paste its contents.
Heroku shows a View button when the app has been deployed (there’s also an Open app button at the top of the page). If you’re running the app on a custom domain, be careful because these links go to the “canonical” name — that is, the one on herokuapp.com, not your CNAMEd-alias. If you use the wrong domain name, you might run into problems with login sessions not working how you expect.
If you’ve using a custom domain: Don’t use herokuapp.com URLs!
12. On the site, complete the set-up phase
When the site first starts up it will be in set up mode, and will remain that way until you’ve completed all the steps, configuring the race server to match your (and your institution’s) requirements. Get a cup of tea and a biscuit because although you can zoom through this (you can leave most of the settings to their defaults), you want to get this right once and not have to worry about it again. See the information about customising the race server.
Pay particular attention to these two important settings (both in the “Server” group, which comes up after you’ve set the auth code and admin user):
-
BUGGY_RACE_SERVER_URL
This should be the URL you and the students use to access the race server. The page will helpfully suggest the value based on the URL you are currently visiting it on — but if you are setting up a custom domain, and it’s not ready yet — you should use that custom domain and not the...herokuapp.comit’s suggesting. (Ideally wait until the custom domain is working). -
IS_STATIC_CONTENT_AUTOGENERATED
Heroku has an ephemeral file system (any files generated by the server — such as the task list, for example — will not still be there after a restart or redeploy, and need to be re-generated). Set this toYesso static content is automatically re-published after a restart, and you won’t have to worry about 404 errors.
If you set AUTHORISATION_CODE as a config var before you ran set up, remember to delete it from Heroku’s interface now, before the server gets restarted — otherwise the value Heroku passes in will overwrite it whatever value you’ve just saved in the database. Go to Settings in your Heroku app, click Reveal Config Vars and click on the cross (×) to delete AUTHORISATION_CODE — you don’t want it set there any more!
Thereafter…
Under normal circumstances, you won’t have to deploy the site again unless you need to upgrade if we release a newer version. But when you do, it’s a much simpler process:
- pull the most recent version of (our) buggy race server source code into your fork (the GitHub web interface provides a Sync fork button to help with this)
- log into Heroku
- go to your app (
buggy-race-serverunless you called it something else) - go to the Deploy tab
- at the bottom of the page, check the branch is
main(that’s the branch you’re normally running from), and click Deploy branch
You don’t need to do a Git pull because Heroku always gets the latest version of the branch you’ve specified (and we always make sure the head of our main branch is the latest working version).
See also this information about setting up nightly backups on Heroku.