Contents of this page:
Distributing the source code
or: How students get their copy of the buggy editor
The project requires each student to have their own copy of the buggy editor source code, which they then develop. This page is about how you ensure all your students get that code to start with.
The source code for the Buggy Editor is available in this GitHub repo: buggyrace/buggy-race-editor. However you should customise the editor repo before you share it.
Decide how you’re going to distribute the code before you set up your server, because several config settings (especially in the “Project” and “VCS” groups) implement this decision. It also affects Phase 0 of the project tasks, which effectively requires the students to get their Buggy Editor running locally.
Here are several ways to distribute the code — they are not all mutually exclusive, although it’s simpler for both you and your students if everyone is doing it the same way.
During the set-up phase, you need to choose the method you are going to use for the EDITOR_DISTRIBUTION_METHOD config setting.
Different methods to choose from
- zip: Students download a zipfile from race server (the default)
- page: Students get the source code from a custom page you set up elsewhere
- repo: Students get the source code from your repo
- preload: You preload the source code by forking repos into students’ accounts
- fork: Students manually fork your repo into their own account
- autofork: Server forks your repo into students’ GitHub accounts
- vsremote: Server forks your repo into students’ GitHub accounts and then clones via VSCode
Over the years we’ve used four of the distribution methods: the first two times we used the auto-forking method: initially, we automatically forked the buggy editor into each student’s GitHub account, which they then either cloned or downloaded by zip. The third time we ran the project, we semi-automated that last stage by cloning onto our remote server through VSCode — that’s the VScode tunnel method. In the fourth year we switched to using the department’s own GitLab server, and directed students to a copy of the editor repo — that’s the repo method. In the fifth year, we experimented with preloading the repos into the students’ GitLab accounts.
Once students had the code, we explicitly made it clear that using Git or GitHub/GitLab was entirely optional within the project, and most never used it (which was fine). But those who did — because we’d injected the issues too — were free to play with it properly. For more on this, see the information on the issues CSV.
There are some additional notes below that apply generally to distributing the code.
zip Students download a zipfile from race server
1
No
Link on the home page goes directly to the zipfile
The race server provides the editor source code as a zip file.
When you "publish" the zip file, you customise the README online, and the Python is updated to include (hardcoded) the URL of your race server.
Git or GitHub isn't used.
- This is what you get if you accept the default config settings in the "GitHub" group.
- It is the simplest to set up!
- You can customise the README on the race server, and URL can be automatically added to the Python
app.py.
- The server controls the contents of the zipfile (it's a sensible commit from the editor repo), but you cannot change this (if you need to, use the page method instead).
Set IS_USING_GITHUB to No.
IS_STUDENT_USING_GITHUB_REPO should be No too.
You can change the zipfile name with BUGGY_EDITOR_ZIPFILE_NAME.
You must explicitly publish the zipfile (which gives you an opportunity to customise the README and automatically add the race server URL to the Python code).
page Students get the source code from a custom page you set up elsewhere
2
No
Link on the home page goes to the page you've nominated
Do this if you're comfortable distributing the source code to your students directly — probably as a zipfile.
This allows you to fully customise the source code before distributing to the students. (You can use the race server's publish mechanism to produce a prototype zip, or you can get it yourself from the editor's own repo).
- You can customise the source code completely before you distribute it
- If you're using an online learning plaftorm (like Moodle or Blackboard) you might prefer to use this mechanism if it allows you to track which students haven't downloaded the source code yet.
- This is pretty much independent of the race server, so you need to arrange the distribution yourself.
Set IS_USING_GITHUB to No and BUGGY_EDITOR_DOWNLOAD_URL to the URL of the page (maybe your own website, or a page on your educational management system like Moodle or Blackboard).
IS_STUDENT_USING_GITHUB_REPO should be No too.
You can publish the zip file on the server, and download it (even though students cannot), which might be a convenient way to produce the customised source code.
repo Students get the source code from your repo
2
you: GitHub account (or GitLab)
students: optional
Link on the home page goes to your GitHub repo
You fork the editor repo into your own (or your institution's) account, and customise it there. Your students get the code from that repo, using whichever method they prefer: downloading the zip, or forking or cloning it.
- You have complete control over the contents of the repo and hence the source code the students download.
- This is common practice for how GitHub is used to distribute source code.
- Students can use Git if they want to (by forking or
git clone), but if not can just download the zipfile
- Students need to be able to download source code from GitHub, which isn't straightforward if they are new to git or file systems
You must fork the editor repo into your own account and customise it.
Set IS_USING_GITHUB to Yes.
Set BUGGY_EDITOR_GITHUB_URL to the URL of your repo on GitHub — and change BUGGY_EDITOR_REPO_NAME and BUGGY_EDITOR_REPO_OWNER to match it.
Keep IS_STUDENT_USING_GITHUB_REPO to No (if it's not optional, you want the forking method))
Keep IS_USING_GITHUB_API_TO_FORK set to No (unless you want to automate this — which is the auto-forking method).
preload You preload the source code by forking repos into students’ accounts
2
you: full admin access (e.g., your institution's own GitLab) instance, although see GitHub Classroom note below)
students: you create accounts/repos for them
Link on the home page goes to your public repo, or students' own repos if logged in (GitLab or GitHub)
If you have full admin access to the platform that's hosting your students' repos (for example, if you're running a GitLab instance), then you can set everything up for them before the project starts.
This means the students' forked repo (and issues, if you want) are already in place for them, and they just need to `clone` their own repo locally to start work.
- If you want your students to use version control as part of the project (and perhaps you're using it for monitoring progress and even assessment) then this method effectively gets everything in place before the students start, with no risk of individual students misconfiguring the set-up.
- Exposes students to Git practice — because they now they can
pushback up to their own upstream (GitHub) repo. - Probably the best mechanism for students new to version control, since each student's repo can remain private.
- Because you're in control of the repo set-up, you can be confident it's correct, which it turn means you can potentially base assessment on activity on the student's remote repos — i.e., make pushing a mandatory part of the project.
- You need to have write-access to your students accounts on the VCS platform, which in turn means you or your institution needs to be running such a host (for example, GitLab))
Fork the editor repo into your own account and customise it. Create accounts for each of your students, and fork your repo into each of those.
Create a CSV of tasks-as-issues and load those into each student's repo.
</p> Set IS_USING_GITHUB to Yes.
Set BUGGY_EDITOR_GITHUB_URL to the URL of your repo on GitHub — and change BUGGY_EDITOR_REPO_NAME and BUGGY_EDITOR_REPO_OWNER to match it.
Keep IS_STUDENT_USING_GITHUB_REPO to Yes.
Keep IS_USING_GITHUB_API_TO_FORK set to No (if you do want to automate this, see the auto-forking method).
It's feasible to use GitHub Classroom in this way, although loading the tasks via an CSV of issues is not supported.
fork Students manually fork your repo into their own account
3
required (or GitLab)
Link on the home page goes to your GitHub repo
This method is the same as the previous one, except the students fork your (or your institution's) repo into their own GitHub accounts first (rather than downloading/cloning directly from yours).
You need to fork and customise the editor repo, and then the students fork that repo into their own accounts. Then they download the source code from their own repo, ideally using git clone.
- Note: if your institution runs a GitLab server then this mechanism works just as well, but without the need for students to have GitHub accounts
- Exposes students to GitHub and Git practice — because they now they can
pushback up to their own upstream (GitHub) repo. - That extra level of de-reference (forking instead of just cloning the code from your upstream repo) has subtle but powerful consequences, and is a useful introduction to how GitHub/remote repos operate.
- Students need GitHub accounts (but see GitLab note above, as an alternative)
- If students aren't going to push commits back up to their repo, there's no real need to fork — instead could just
git clonefrom your repo.
You must fork the editor repo into your own account and customise it.
Set IS_USING_GITHUB to Yes.
Set BUGGY_EDITOR_GITHUB_URL to the URL of your repo on GitHub — and change BUGGY_EDITOR_REPO_NAME and BUGGY_EDITOR_REPO_OWNER to match it.
Keep IS_STUDENT_USING_GITHUB_REPO to Yes.
Keep IS_USING_GITHUB_API_TO_FORK set to No (if you do want to automate this, see the auto-forking method).
autofork Server forks your repo into students' GitHub accounts
4
required
Link on the home page goes to your GitHub repo (but students don't need to go there)
You need to fork and customise the editor repo, and then the students fork that repo into their own accounts. Then they download the source code from their own repo, ideally using git clone.
- Exposes students to GitHub and Git practice — because they can
pushback up to their own upstream (GitHub) repo. - Server can automatically inject the tasks as GitHub issues into each student's forked repo: if you're teaching Git/GitHub workflow then this is a very useful feature!
- You need to set up a GitHub OAuth app that students grant permission to access and operate on their GitHub account.
- You'll be storing a GitHub access token for each student on the race server: be responsible with security.
- This is overkill if students aren't going to push commits back up to their repo, there's no real need to fork — instead use a simpler mechanism.
- If your institution is running a GitLab server and you prefer to use that, you cannot use this method: the race server code for this is GitHub-specific... but your tech team may be able to fork the editor repos directly into students' GitLab accounts for you, which is even better — ask them!
You must fork the editor repo into your own account and customise it.
You must also create a GitHub OAuth app.
Set IS_USING_GITHUB to Yes.
Set BUGGY_EDITOR_GITHUB_URL to the URL of your repo on GitHub — and change BUGGY_EDITOR_REPO_NAME and BUGGY_EDITOR_REPO_OWNER to match it.
Set IS_STUDENT_USING_GITHUB_REPO and IS_USING_GITHUB_API_TO_FORK to Yes.
Optionally — but we recommend it — set IS_USING_GITHUB_API_TO_INJECT_ISSUES to Yes too.
Add the credentials from your OAuth app to GITHUB_CLIENT_ID and GITHUB_CLIENT_ID.
vsremote Server forks your repo into students' GitHub accounts and then clones via VSCode
5
required
Link on the home page goes to your GitHub repo (but students don't need to go there)
This method is the same as the previous one, except students use a VCSCode workfile that clones their repo into an external account (such as a Unix server), which they then access through a SSH tunnel through VSCode.
You'll also need to set up port number mappings so students can access their own buggy editor as "localhost" despite the app running on a remote server.
- This might be useful if your institution has a "teaching server" you can run all student's accounts on: development happens on the remote server.
- Forces all students to be using identical, but sophisiticated, dev environment with no provisioning required
- Requires staff tech expertise (on the remote server) to set up.
- The VSCode tunnel can be counterintuitive to use.
- Discourages students from working on their own devices (because the repo has been explicitly cloned onto the external server),
- This can be opaque or confusing for students who are unfamiliar with remote servers.
- As for the autofork method above, this won't work if you're using your own GitLab server instead of GitHub... but in that case, you may be able to populate your students' GitLab repos directly — ask your tech team!
You must fork the editor repo into your own account and customise it.
You must also create a GitHub OAuth app.
On the remote server, set up mappings on the remote server that apply a unique port number for each student. Also make sure the required Python environment is set up for the students.
Set IS_USING_GITHUB to Yes.
Set BUGGY_EDITOR_GITHUB_URL to the URL of your repo on GitHub — and change BUGGY_EDITOR_REPO_NAME and BUGGY_EDITOR_REPO_OWNER to match it.
Set IS_STUDENT_USING_GITHUB_REPO and IS_USING_GITHUB_API_TO_FORK to Yes.
Optionally — but we recommend it — set IS_USING_GITHUB_API_TO_INJECT_ISSUES to Yes too.
Add the credentials from your OAuth app to GITHUB_CLIENT_ID and GITHUB_CLIENT_ID.
Set IS_USING_REMOTE_VS_WORKSPACE to Yes and provide values for PROJECT_REMOTE_SERVER_ADDRESS, PROJECT_REMOTE_SERVER_NAME and PROJECT_REMOTE_SERVER_APP_URL.
Things to consider when distributing the code
Here are some additional notes that apply to some of the methods above.
Check the documentation matches what you’re telling your students to do
When you have finished your set up, check that the documentation reflects what you want your students to do — that might be in the editor’s (customised) README, as well as the phase 0 tasks and the tech notes.
Unzipping is not straightforward for everyone
If you use a distribution method that results in your students downloading a zipfile, remember that extracing files from a zip can be confusing.
Make sure your students know how to extract files from a zip. It will matter where in their file system they extract the application, and whether or not they create an enclosing folder when they unzip it. The current Windows user interface makes this surprisingly confusing, because it encourages opening the zip file without explicitly extracting it.
It’s increasingly common to encounter students who do not have any experience navigating file systems, and unzipping the editor files can be especially bewildering to them. The superbasics on file systems is a helpful resource for students who are new to these concepts.
How to download a zip from a GitHub repo
If you’re distributing the editor code via your forked GitHub repo, but don’t require students to use Git, be aware that it’s not obvious to newcomers how to get the zipfile.
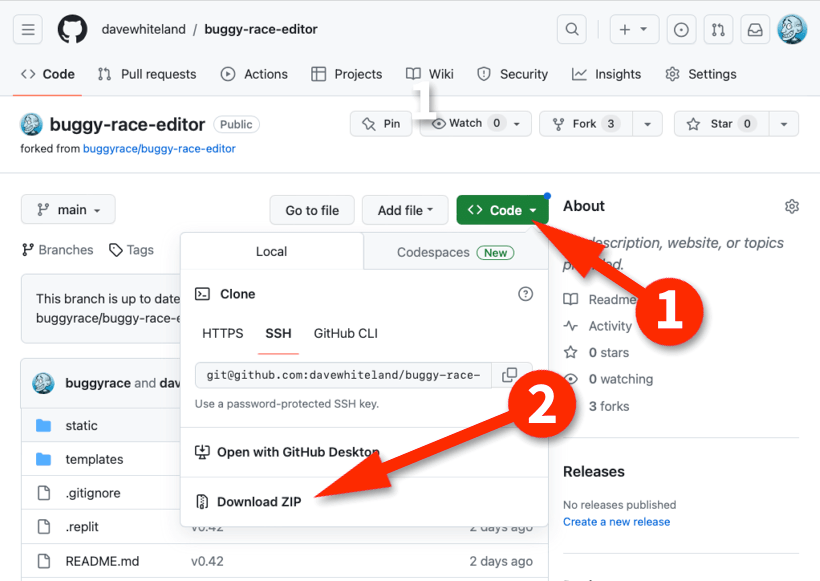
To download a zipfile containing the editor source files, click on the green Code button (1) and then Download ZIP (2)
Enabling automatic forking (methods autofork & vsremote)
The server can automatically fork the repo into each student’s GitHub account (and, optionally, inject GitHub issues too — one for each task). We recommend this if you want to expose your students to Git even though they don’t need to use it.
To enable this, there’s a little more set-up required on your part. You need a GitHub Oath app that has permission to fork into their GitHub accounts. You set this up on GitHub, but need to tell the race server the app ID and client secret.
Set IS_USING_GITHUB_API_TO_INJECT_ISSUES to Yes if you want that feature too. Depending on the level you’re teaching at, use of Git (including feature branches against each of these issues) could form part of your assessment. That’s up to you. Even if you’re not using Git, we think that having the tasks as issues is a passive way to help interested students appreciate how Git Issues can form part of a professional workflow.
Setting up the GitHub OAuth app
You only need the GitHub OAuth app if you have set the config setting IS_USING_GITHUB_API_TO_FORK to Yes.
If you’re not automatically forking the buggy editor source code into students’ GitHub accounts, you don’t need to do this!
The OAuth app requests permission from the student for write access to their GitHub account, in order to fork the repo for them (and, if you have chosen it, to inject the tasks too).
You need to create the OAuth app up on GitHub. There’s no coding involved (because your race server already has the “back-end” code needed for the callback): you just have to fill in the online form. The name of the GitHub account you use will be exposed to your students (which is already the case if you’ve committed your customisations to the editor source code with it).
See the instructions on GitHub for Creating an OAuth App
These are the key points:
-
Set the app’s Homepage URL to your race server’s URL (this is what you set in the config setting
BUGGY_RACE_SERVER_URL) -
For Application description, add something that will confirm to your students that this is the right place, such as “XYZ Buggy Racing server for the ABC course”
-
For Authorisation callback URL, this must be a full URL to your race server, starting with
https://with the path/oauth/github/callback
For example, it should look something like:
https:www.example.com/oauth/github/callback -
Provide a logo — either make your own or reuse/edit our basic stripey square.
When you’ve created your OAuth app, GitHub will show you its ID and invite you to set a secret. You need to tell your race server both of these values: put those into the config settings GITHUB_CLIENT_ID and GITHUB_CLIENT_SECRET. Be careful with that secret: treat it as sensitive password. A malicious attacker with access to the secret could abuse students’ GitHub accounts. (It is, by necessity, held in plaintext backstage on the server, which is why you must take security on your server seriously too).
This OAuth app is only used when setting up the students’ repos — it’s not used again once all your students have got their editor source code.
- Previous: What is it?
- Next: Customising the editor